
Scientific Computing and Data / High Performance Computing / Documentation / Logging In
Minerva’s Authentication
The Digital and Technology Partners (DTP) department has phased out the Symantec VIP token as the two-factor authentication method for Minerva. Minerva has switched to Microsoft’s Azure multi-factor authentication (MFA) since 9:00 am Thursday, March 26, 2026.
Available authentication methods:
There are 3 methods enabled. You can choose either one of them:
Method 1: Phone Text passcode (Mount Sinai profile default),
Method 2: Microsoft Authenticator App – push notification,
Method 3: Microsoft Authenticator App – one-time password code
By default, users who didn’t setup Microsoft Authenticator will receive Phone Text SMS message codes (method 1). Microsoft Authenticator installation on the mobile phone is optional now.
To authenticate to Minerva, after you are connected to Mount Sinai VPN from your PC, please follow:
Method 1: Phone Text SMS message code – Users who didn’t install Microsoft Authenticator on the phone:
From a SSH terminal application like Putty on your PC or Terminal on MacOS:
ssh yourUserID@minerva.hpc.mssm.edu
(yourUserID@minerva.hpc.mssm.edu) Password: <Enter your Sinai School Password Only>
Enter Your Microsoft verification code<609017>
You will receive a 6-digit code in your phone Text SMS message. Enter that code after the prompt, like above 609017.
Step 0: Install and register Microsoft Authenticator on your phone for Microsoft MFA with your school network account, following Option 2 at https://itsecurity.mssm.edu/mobile-device-security/ms-authenticator/
1) If you already have Microsoft Authenticator registered with Option 2, go to Step 1.
2) If you previously registered with Option 1 phone number, you still need to register with Option 2. Option 1 will send phone text code, no phone push.
3) If you are a new user to get started with MFA, please complete Option 3 and Option 2.
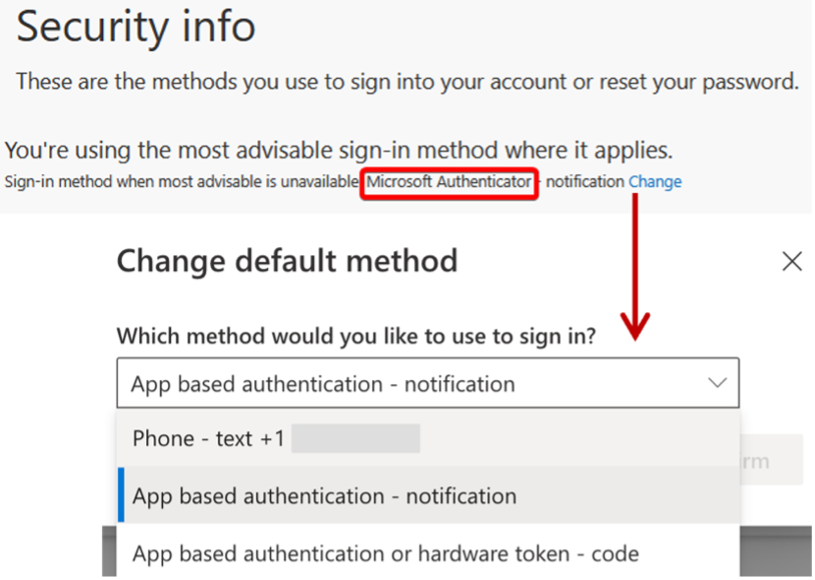
Step 1: Check and make your default sign-in method to Microsoft Authenticator.
Login to https://mysignins.microsoft.com/security-info, in the Security Info page click ‘Change’ and select “App based authentication – notification” from the drop-down options (See picture below). Microsoft Authenticator must be the Sign-in method when most advisable is unavailable, as shown in the red box in the below picture. If you see your phone number there, please do the change.
If you cannot login to https://mysignins.microsoft.com/security-info with your Sinai school account, or cannot change the methods, or the Microsoft Authenticator method disappears after refreshing the webpage, please send a ticket to hpchelp@hpc.mssm.edu.
Step 2: SSH login to the Minerva login test server with your Sinai school password only:
ssh yourUserID@minerva.hpc.mssm.edu
yourUserID@minerva.hpc.mssm.edu's password: <Enter your Sinai School password only>
Wait for Step 3.
If you get error “Permission denied (gssapi-keyex,gssapi-with-mic,password).” even before password input, please check your local ssh config file like ~/.ssh/config, remove line “PreferredAuthentications keyboard-interactive” or similar, or remove the config file.
Step 3: Wait for the following Microsoft Authenticator push notification dialogue on your phone (usually in 10 seconds, see picture below). Select Approve to complete login.
1). You shall see this push dialogue from your Microsoft Authenticator App on your phone to get authenticated.

2). If you received an SMS text message code, and get denied with “Permission denied, please try again.” This method has not been configured properly. Please follow above Step 1 to change your default sign-in method to Microsoft Authenticator.
3). If you don’t receive any notification on the phone, please start over from Step 0.
Step 4: If Step 3 is successful and you have successfully logged into Minerva.
You don’t have to use Method 2, but if you elect to use it and still have trouble with the enrollment after making ‘App based Authentication – Notification’ as the default method in Step 2, or see issues other than those specified in the above Steps, please email us (hpchelp@hpc.mssm.edu).
Method 3: Microsoft Authentication hardware token method
Follow Step 0 in Method 2: Microsoft Authentication push notification method but select “App based notification or hardware token – code” in Step 1. Use the 6-digit one-time password code from your Microsoft Authenticatior app on your phone when prompted for Microsoft Code.
Virtual Private Network (VPN) Tunneling
Connection to Minerva from off campus requires the use of VPN and the F5 Big-IP software to be installed on your local workstation.
To setup VPN access, see https://itsecurity.mssm.edu/vpn-steps/
To setup the F5 Big-IP software to enable tunneling on Windows or MAC, see https://itsecurity.mssm.edu/vpn-access-selection/
Instructions on F5 Setup on Ubuntu
On your local workstation, go to https://mshmsvpn.mssm.edu and log in with your password and VIP credentials. The welcome page will have many boxes. Click on linux_deb and download the f5 software. Open a terminal on your workstation and enter one of the following commands:
 sudo apt install /absolute/path/to/deb/file
or
 sudo dpkg -i /absolute/path/to/deb/file
/opt/f5 will be created. Click on “tunnel” and on the f5 popup, “Choose” /opt/f5/vpn/f5vpn and you should be in.
Instructions for F5 Centos/Red Hat systems
On your local workstation, go to https://mshmsvpn.mssm.edu and log in with your password and VIP credentials. The welcome page will have many boxes. Click on linux_rpm and download the f5 software. Open a terminal on your workstation and enter one of the following commands:
For Centos:
	sudo yum localinstall /absolute/path/to/rpm/file
or
	sudo rpm -i absolute/path/to/rpm/file
For Red Hat/Fedora:
	sudo rpm -i /absolute/path/to/rpm/file
or
	sudo dnf localinstall /absolute/path/to/rpm/file
/opt/f5 will be created. Click on “tunnel” and on the f5 popup, “Choose” /opt/f5/vpn/f5vpn and you should be in.
Login Nodes:
Minerva currently has several login nodes which are used to access the compute cluster. The login nodes are connected to the campus network allowing access only on campus or via tunneling over Mount Sinai’s VPN if off campus.
There are currently four login nodes available for general use, minerva12, minerva13 and minerva14.You may connect to one of them through one of two round-robin Domain Name Server (DNS) load balancing names or you may specify one of them explicitly, if you prefer one over the other.For example, if you have a disconnected screen session running on one of the nodes, you will want to log onto that particular node if you want to reconnect.
The addresses of the nodes are:
- minerva.hpc.mssm.edu – round-robin redirect
- chimera.hpc.mssm.edu – round-robin redirect
- minerva11.hpc.mssm.edu – specific login node
- minerva12.hpc.mssm.edu – specific login node
- minerva13.hpc.mssm.edu – specific login node
- minerva14.hpc.mssm.edu – specific login node
Suggestion: Use the name minerva.hpc.mssm.edu for your connections, as it will continue to work in the future even if the login nodes are changed.
From Windows
To log in from a Windows machine, you will need a terminal emulator. There are two that we recommend.
MobaXterm ( https://mobaxterm.mobatek.net ) an all-in-one product that provides a terminal emulator, builtin X11 server, multiple tabbed windows, scp, sftp, etc.
PuTTY ( https://www.putty.org/ ) a widely used SSH client and associated utilities (scp, sftp, etc). PuTTY does not come with a built in X11 server. Users will have to install Xming ( https://sourceforge.net/projects/xming/ ) if they wish to use X11 graphics.
From MAC
MAC machines come with a console window already installed. However, you may want to install a more versatile terminal emulator such as iTerm2 ( https://iterm2.com )
As with the Windows environment, macOS does not come with an X11 server. So, if you want to use X11 graphics you will need to install the XQuartz X11 server ( https://www.xquartz.org/ ) .